Table of Contents
Several Apps are available on the Play store. So, it is quite difficult for these Apps to stand out and keep the user interested in today’s business marketplace. According to a recent survey, approximately 28% of the Apps are deactivated after being installed for 30 days.
So, how can we keep the user engaged with our App?
Push notifications are a very effective way for communicating with your target audience. These notifications are a superb marketing tool because of the benefits they provide such as promotions, improved user engagement and user retention, boost conversion rates, making a better user experience, and various user data that can be tracked.
So, why delay? Let us go ahead and incorporate flutter push notifications into your mobile applications.
In this post, we will show you how easy it is to do this. But before proceeding further, let’s discuss push notifications briefly.
What Push Notifications Are
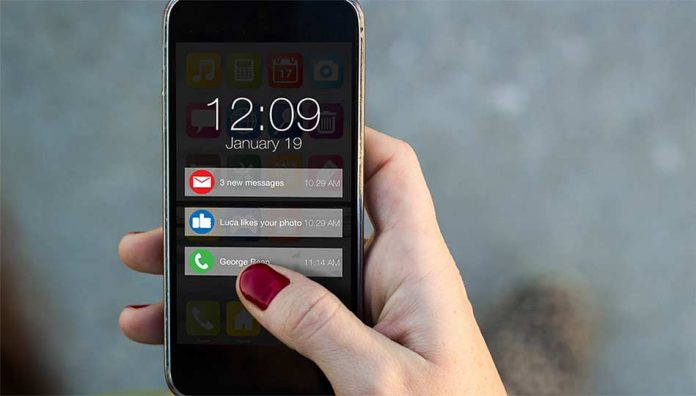
Push notifications are messages that are delivered to a user’s device or web browser in the form of rich media or text. These notifications can be sent via a third-party service when the app is not running or can be triggered locally to provide convenience and value to app users.
Moreover, they are an excellent way to engage with your users. For example, an app user may receive push notifications for local traffic, weather, discounts, special product offers, etc. A push notification is a direct way for app publishers to communicate with users without worrying about being hidden in someone’s inbox.
How Can You Incorporate Push Notifications Into Your Mobile Apps?
Here is how you can add flutter push notifications to your mobile apps.
Now, let’s discuss each step in detail.
Step 1: Build A Firebase Project
To add push notifications, firstly, we require to build a firebase project. Hit on “Add Project” to build a project.

When you press the “Add Project” button, Your project name will be requested when you click the Add Project button. Type it in the project name input box, and agree to the terms and conditions.

The following screen will give you the choice to enable Google Analytics for your project, which is required because Firebase Cloud Messaging is part of the Google Analytics suite. To the right, select Enable Google Analytics for this project and click the “Continue” button.
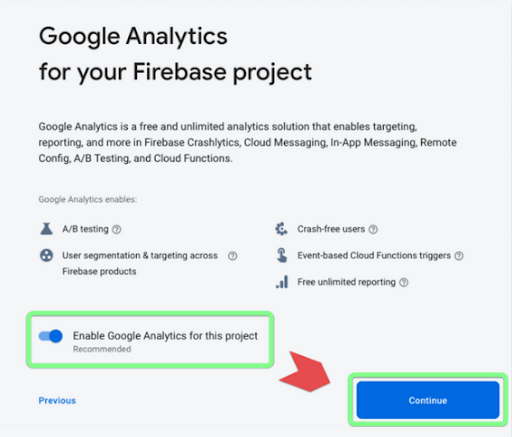
When allowing Google Analytics, you will be asked to build a Google Analytics account to choose an existing one. Choose the default choice and press the “Create Project” button.

Connecting Android Studio and Firebase is the next step. As a result, after the project is built, Firebase will take you to the Project Overview screen. To add this platform, select the Android logo.
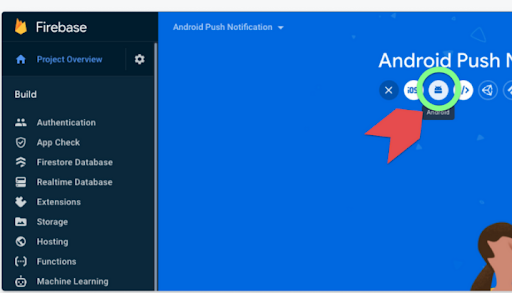
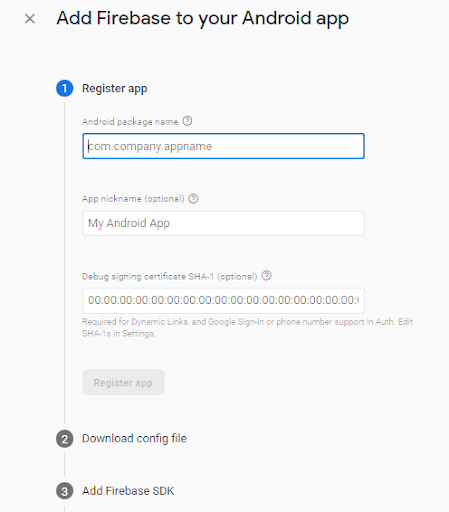
We are required to build an Android app on Firebase. So, we must have a package name and SHA-1 certificate from our application.
Follow the command to get SHA-1 for Windows
First of all, find your JDK’s bin folder on your Windows
![]()
Then, open the screen of Command Prompt as Administrator mode on a similar path and input the command.

Type the store password, and also type this command

Then, you receive an SHA-1 key, copy and paste it into firebase
Copy a debug. keystore file from the java bin and paste it into the android/app.

Download the google-services.json file and paste it into the android/app.
STEP 2: Install Push notifications dependencies
First, install the “app” module.

For Android:
First of all, add the google-services plugin as a dependency in your /android/build.Gradle file.
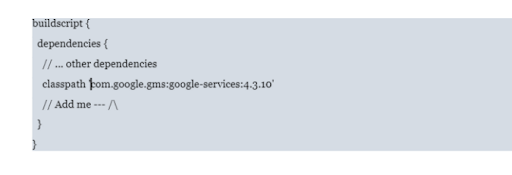
Then, deploy the plugin by adding the following to your /android/build.Gradle file

Step 3: Create an application on Android
Firebase Cloud Messaging
Firebase Cloud Messaging (FCM) enables you to deliver messages securely and without cost. With various notification types, you can send messages to all actual iOS and Android devices with the help of Firebase Cloud Messaging. Depending on the action, the app will display a different message. Foreground, Background, and Quit alerts are the three different categories. The application will display a certain message based on the status.
To receive an FCM token:

Step 4: Send Push Notifications From FCM
To send a push notification, navigate to Firebase Console, then choose Cloud Messaging. Next, tap “Send your first message”
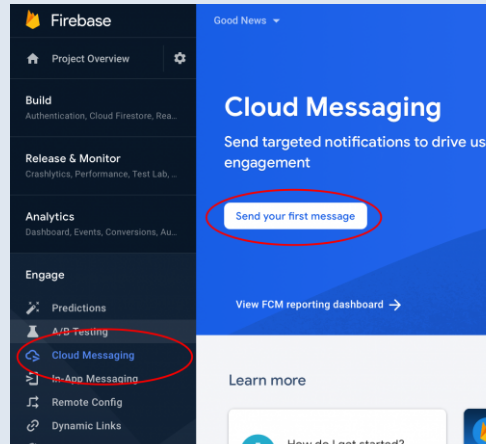
Input the Title and notification content.

If you want to send it to a specific device, then hit “Send message” and type the FCM registration token.
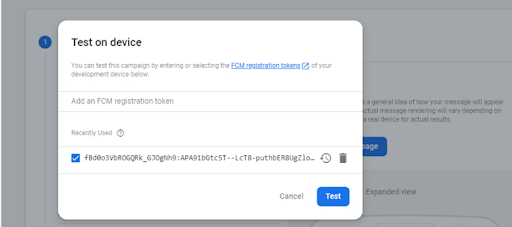
Finally, press the “Test” button.
Congratulations! Push notifications have been sent successfully.
Wrap Up
That’s it! This is how you can add flutter push notifications to your mobile apps. So, why think? Visit WonderPush, where you will be provided automated push notifications. Create and send push notifications and keep your users engaged with your app.


